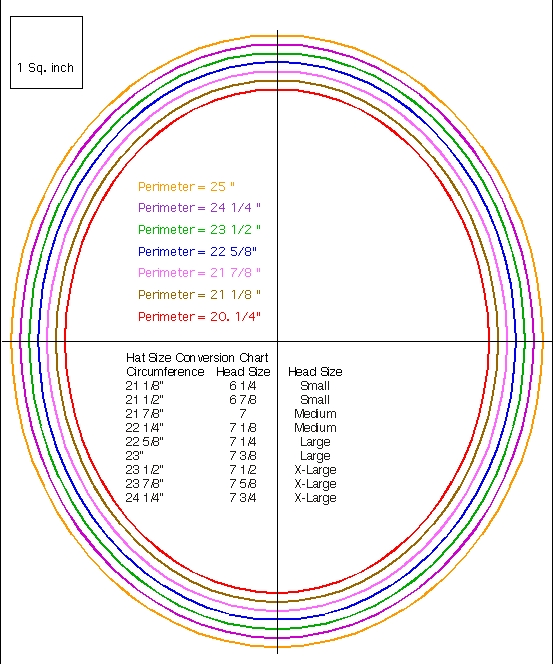
You might want to look at this basic article so you can understand head size and shape good reading for most all patterns. Also my Millinery Articles page has many How-tos that can be of help. You might also want to follow my Instagram page and/or my New Facebook page for notices of new articles.
If you do not find your link, please e-mail me and I will update things and transfer the links or articles.
| 01 Men’s Eliz.high crowned hat •buckram info •3 part hat | 02 Men’s Eliz. arched brim hat •buckram info •3 part hat | 03 Women’s Eliz. Attifet •buckram info | 04 Eliz. French Hood •buckram info | 05 Women’s Eliz. Italian Bonnet •buckram info |
| 06 Eliz. Brimless Hat •buckram info | 07 Women‘s Eliz. arched brim Hat •buckram info •3 part hat | 08 Women’s Eliz.high crowned hat •buckram info •3 part hat | 09 L. Tudor-E. Eliz. French Hood •buckram info | 10 Men’s Eliz. Italian Bonnet •buckram info |
| 11 Men’s & Women’s Medieval Hat •buckram info | 12 Men’s and Women’s Tudor & Eliz. Flat Caps •buckram info | 13 Single Seam Coif | 14 Arming Hood & Double Seam Cap | 15 Women’s Biggins |
| 16 Eliz. Blackwork Caul | 17 Eliz. Gold Mesh Caul | 18 Universal Oval Brimmed Hat •buckram info •3 part hat •petersham •Drawstring lining | 19 Universal Round Brimmed Hat •buckram info •3 part hat •petersham •Drawstring lining | 20 Riding, Top or Stovepipe Hat •buckram info •3 part hat •petersham |
| 21 Men’s and Women’s German Hat | 22 Silk Partlet Pattern | 23 Spiral Sleeve Pattern | 24 Henry VII Hat •buckram info | 25 26inch Doll Body Pattern |
| 30 Cloth of Gold Escoffion | 31 double X knot gold Caul, caps and Reta Pattern | 32 Early Victorian Bonnet •buckram info | 33 Men’s or Women’s Georgian Tall Hat •buckram info •3 part hat | 34 Wellington, Mad Hatter, Muller Cut Down Top Hat •buckram info •3 part hat •Straw over buckram |
| 35 Mid-Victorian Winter Bonnet •buckram info | 36 Highlander Clothes for 25″ Fashion Doll | 37 Early 19C Seaside Bonnet •buckram info •Straw over buckram | 38 Regency Bonnet •buckram info •Straw over buckram | 39 Romantic Bonnet •buckram info •Straw over buckram •Blocking |
| 40 1840-50’s Period Bonnet •buckram info •Straw over buckram | 41 US Civil War Bonnet •buckram info •Straw over buckram | 42 US Civil War Summer Hat •buckram info •Straw over buckram | 43 Late Victorian Tall Hat 1875-85 •buckram info •3 part hat | 44 Late Victorian Small Bonnet 1885-95 •buckram info •Straw over buckram |
| 45 Early 1870’s Bustle Hat •buckram info •3 part hat •Straw over buckram •Blocking | 46 18th C Men’s Waistcoat | 47 LaBelle Epoque 1895-1905 •buckram info •All the articles | 48 Natural form Era Bonnet •buckram info •Straw over buckram •Blocking | 49 L. Edwardian E. Teens small hat •buckram info •Drawstring lining |
| 50 19th Century Cape | 51 1920s Collapsible Hat | 52 Late Teens Early 20’s Hat •buckram info •View D photos •Drawstring lining | 53 Modern Soft Hat | 54 Hard Crown Regency Bonnet •buckram info |
| 55 Napoleonic Era Hat •buckram info •3 part hat •Straw over buckram | 56 Victorian Brimless •buckram info •Straw over buckram | 57 1845-50 Drawn Bonnet •Link | 58 1855-60 Drawn Bonnet •Link | 59 Lace Cloche Instructions |
| 60 Fan pattern with 3 sizes •How to e-mail me for password •fan articles | 61 Lace Brim Hat •buckram info •History of the hat | 62 Early 20th C turbans •Turban last •Cloche block •Head wrapping | 63 Victorian bonnet ca. 1870-90 •buckram info •Straw over buckram •Straw flowers | 64 18th C Day Caps |
| 65 L.18thC E. 19thC Day Caps | #66 – 1920s Sewn Fabric Cloche | #67 – 20s-60s Deep Crown Pattern | #68-Medium Depth 1920s Crown | #69-20s-60s Brims for #67 & #68 |