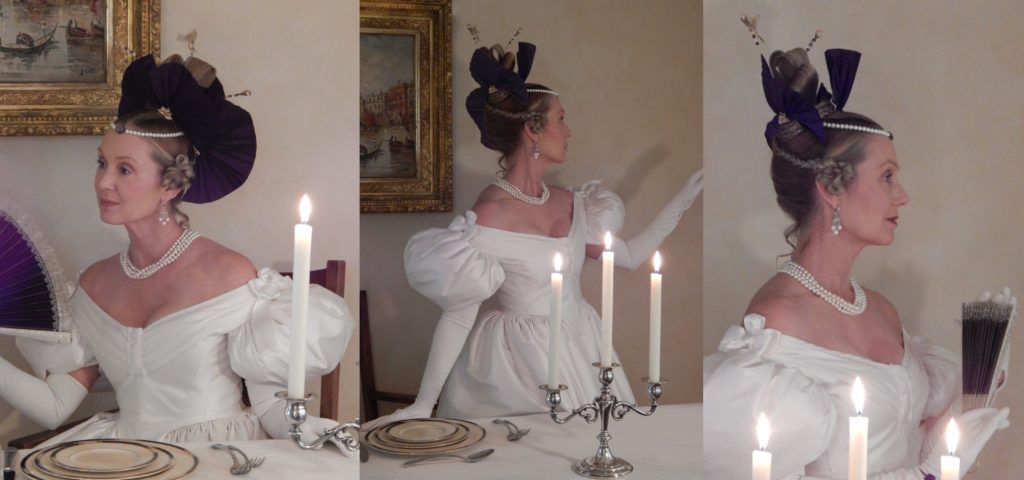
For this look I wanted to give Katherine all the ornaments and hairpieces, so that she could style her hair in a very dramatic 1830s style in less than an hour. With just a little practice she got it down to 45 minutes even at a slow pace. This is not a style from any one historical plate, but has different elements from three or four different hairstyles.
The Fans

To make the fans, I needed to stiffen some taffeta. I brushed on some Aleen’s Stiffen Quick.

Then clipped the fabric on a clothes hanger,

then let it dry outdoors,

When it was dry, the fabric was a little darker than the untreated fabric. But the advantage is, the fabric can now be pressed, cut into shapes, and folded without fraying.

I drafted a pattern for a fan in the size I wanted,

Cut it out,

and I folded it into a fan.

Then opened the pattern up and pressed it to a piece of freezer paper with the waxy side up.

I cut this out, and folded it up along the same lines,

I then pulled the freezer paper fan away from the paper pattern fan.

The freezer paper fan was fused to some of the stiffened fabric by ironing.

The fabric was cut out and folded along the same lines. A good pressing with a hot iron helped set the pleats.

The freezer paper was removed, and the process was repeated two more times with the same piece of freezer paper to get three fabric fans.

A piece of 20-gage wire was cut to the same length as the base of the fan.

Glue was added to one side of the fan in the first fold.

The wire was glued into the fold.

This is repeated along the other side of the fold. Once completed, wire was added to the other two fans.

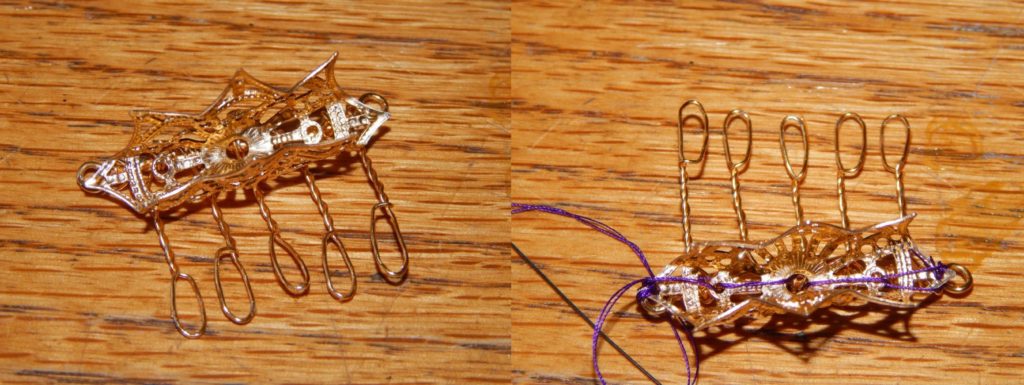
I did not like the idea of plastic combs for the fans, and I did not have any gold metal combs of this size, so I made some out of thin gold wire. I cut three pieces of wire about 24” long, and another three about 4.5” long.


I bent some decorative metal rounds into “U” shapes to hold the fans and sew to the metal combs.

The comb was sewn to the “U” shaped metal piece at a right-angle with silk thread.

I use wire cutters to cut a pearl and gold-coated metal ornament in half. This was glued to the comb.

Then the fan could be glued and sewn into the “U” channel.

Here is a finished fan.Then the fan could be glued and sewn into the “U” channel.
Hair (side curls and braids)
To make the side braids I used a hank from the full length of a package of braiding hair (~70”) and braided almost the entire length.

I created a 3/4″ braid using braiding hair in Katherines mix. Using my machine I sewed it right across the center back and forth three times, then again about ½” away.

I then cut it apart between the stitching.

I cut two 8” lengths of hair about ¼” thick by 1/2” wide and sewed one of them to the cut end of each braid at the halfway point of the 8” lengths.

I then folded the lengths up to cover the cut ends of the braids and sewed this down again.

I sewed a toupee clip to each braid and trimmed the ends of the unbraided hair evenly.

To curl the hair I divided it into three strands.

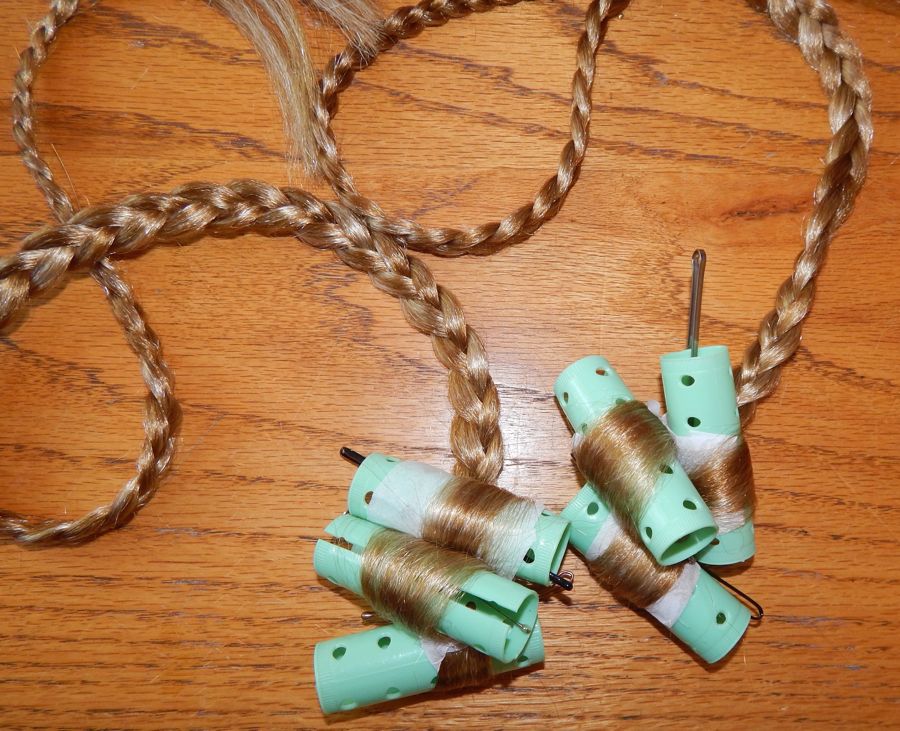
Using tissue paper I rolled the hair from each braid onto small curlers.

So that the braid did not get steam set, I bundled it up into a towel. Then I steamed the curled ends for 1 minute and stuck it in the freezer for 5 minutes. To refresh how to work with synthetic hair, check out my other hairstyling articles on this subject.

In the end, I figured the green curlers were not small enough so I re did the steam/cold set process with smaller curlers.

This is how they looked when with the pink curlers removed.
Hair (Apollo’s loops)

I wanted to make three loops of slightly different heights so I drew lines on a piece of tissue paper at 12”, 10” and 8”.

I laid out equal thicknesses and widths of hair to make sure that they were wide (long) enough.

I sewed forward along the drawn line over the longest hanks using a short stitch length,

and then reversed.

I repeated this three timesI repeated this with all three hanks on the right side, and then on the left, making sure that the hank was flat and smooth while sewing.I repeated this three times

I cut the three sections apart, and then cut the paper down the middle and folded it back under.

I folded the free end of the hair over and sewed it over about 1/8” from the first line of stitches and the folded tissue paper.

I reversed and sewed back to the start.

Then the loose ends of the threads needed to be knotted off and buried between the rows of stitches. This stitching is repeated with the other 5 ends.

They looked like this when they were done.
In the Regency they lacquered human hair to make these types of hairpieces, so I decided to use a water-soluble spray urethane to go with the synthetic hair, because I figured an oil-soluble product might dissolve the plastic. It worked even better than I hoped. I sprayed the hanks front and back and folded them in half long ways. I covered a 1” wooden dowel with plastic wrap and draped the middle of the hanks over the wrap. I spread the hair over the dowel out to make the loops wider at the fold.

I sprayed the hanks front and back and folded them in half long ways. I covered a 1” wooden dowel with plastic wrap and draped the middle of the hanks over the wrap. I spread the hair over the dowel out to make the loops wider at the fold.

I added binder clips to weight down the folded hanks

This is Here they are after they dried and were removed from the dowel.This is
Hair (putting it all together)

I fashioned a long toothed comb with a circle of twisted wire tilted up 80°. If you don’t have twisted wire, a thick 18-gauge wire could work. But the twist helps it stay in place. The teeth on the comb are about 2” long.

I covered the round platform by sewing stretch lace in the closest color to Katherine’s hair.

This is what it looked like from the bottom.

I gathered all the fabric to the upper side, as that will be mostly covered with the hair and other decorations.

I began adding elements, using three wires that had crystal beads added to one end, to the comb by wrapping the ends of the wires around the teeth of the comb and the edge of the platform.

This is what it looked like with all three added.

I sewed the bases of the hair loops together to form a single unit. They fanned out from the shortest in back to the longest.

To support the hair, I added an 18” long piece of wire across the platform and twisted it in the middle with the ends angling straight up. The loops were threaded down the wires so that they do not show.

Here is a shot of the finished hair bits and ornaments arranged together. Note, they are all still individual pieces.