
If you have short to medium hair even if you have very long hair, anyone that wants to replicate a women’s Natural Form Era (1877-82) hairstyle first has to start by rounding up some extra hair. This period is the ~ the first half of the Gilded Age extra hair is needed for the second half as well.
That was true of most women that wanted to be in style for the entire Bustle Era and into the early 20th as well. In this article I will describe the making of several must have hairpieces from an inexpensive but lifelike synthetic hair.

Caption: In the figure above from Peterson’s Magazine 1879, which was intended to be a step by step of a new hairstyle of that year. I count at least two hair switches (numbers 1 and 2 maybe C), a set of false bangs D and the curls on top. The period figure was modified so that you could see the labels and the blue was not in the original.
Postiches
For the Natural Form Era the use of postiches (French: postiche [ Italian: posticcio] counterfeit) or hairpieces is well documented in fashion magazines and hair dressing manuals. Women often relied on three or four main pieces; false bangs, small pin curls for the back of the neck, long switches or long switches wound into fixed chignons. I found quite a bit of information on how it was done, the book “An Illustrated Dictionary of Hairdressing & Wigmaking by J. Cox” has many figures from La Coiffure Illustrée (a French period journal) that shows these pieces and how they were used. It is out of print but you can get a used paperback copy, I recommend it.
Another book “The Techniques of Ladies’s Hairdressing of the 19th Century-a compilation of original 19th century sources” by Mark Campbell and Mons A. Mallemont” is a Lacis compilation of two books. The first is a little early and the second is a little late but both have many of the techniques that would have been used in the construction of hairpieces and in the styling of hair in the Natural Form Era. I found the first book, “Self-instructor in the art of hair work: dressing hair, making curls switches, braids and hair jewelry of every description compiled from original designs and the latest Parisian patterns by Mark Campbell, 1867” on google books however the scan of the figures is not all that good the Lacis book is better. The first half of the Campbell book is mostly on making hair jewelry but starting in section three there are pages on making (weaving) false hair and then on the latest styles (late 1860’s).
There are reasons to use postiches, one may not have long enough hair of their own or it is very thin. Also curled hairpieces can save on having to curl your own hair every time you dress it. The use of hot irons to style the hair was expanding in the Bustle Era but they did and still do take a toll on your hair. I read in Mallemont’s book that if you had your hairdresser style your hair in waves in the Marcel pattern (Marcel Grateau invented the wave in 1875) something that could take several hours it should last a fortnight. I don’t think that most costumers would want to keep their hair up for 14 days!! Using hairpieces becomes even more attractive.
When making hairpieces one of the most important thing is to get the right product, Rastafri Freed’m-silky-Braid. It is 20-24” folded in half which makes it 40-48 when opened out.
Matching your hair color
Most online sellers have an on-screen color swatch that can be helpful but it is always best to visit a store in person with a friend. Make sure it is a store that has most all the colors. Have your friend pick a match of your hair from the top and the underside when you have it pulled up. Do this under natural light most stores will let you take it outside or at least to a window. This stuff is inexpensive from 3 to 5 dollars per package so get a few packages. It might happen that you hair is different by a shade or two. Get both or all three they can be blended (next section). If you have highlights that are many shades apart that’s a little more difficult. I would suggest that you pick some shades that are in between your base hair and your highlights and blend those. Keep records of the color numbers most brands are the same across the numbers that way you can mail order in the future. If you can only get to as store that has a limited selection you can figure out that you are between two numbers then mail order the missing number. Look for a wig store or large beauty supply store. Do not get human hair even if it looks long enough it is made on weft that has long hair on one side of the stitching and very short hair on the other. These short hairs stick out in every direction when you try to braid it and it will not curl even with a curling iron. The only way to style it is to give it a perm.
Blending hair
If you find your hair is a perfect match for one color you are very lucky you can most likely order pre-made hair pieces and just re-style them (more later on that) but if are like most people a blend of two colors or maybe just between two colors then, blending as below is your best option and a really good reason to make your own postiches. I used two packages to make four switches.
The first step is to clear the table. Then open the packs of hair and un-braid them. At any point along the way there will be minor tangles. I use my fingers to finger comb the hair and keep it relatively tangle free. When making any hairpieces you will loose some hair save these and set them aside to make rats they can come in very handy for Edwardian and very late Victorian hairstyles.
This is how the hair will look just out of the package.


When un-braided the hair will have a rubber band in the center, it is best to cut it.
Once it is cut, slowly spread the hair out in as thin a layer as possible.


Clean the table even more and spread the second color out in the same manner.
Slip a wide ruler under the second package and lift the whole thing on top of the first.


Divide the layered hair into two bundles.
Spread the hair out as before.


Flip one bundle on top of the other as before.
If the hair is mixed to your liking divide it in to 2 even lengths from the center. If no you can repeat the steps above. Each bundle will make two switches.


Divide the two lengths into two each. Tie a ribbon around the center of each length to keep all the hair together for the next step.
Now match a thread to the hair.

You can of course skip most of the steps above if you can buy your hair without having to blend it. Just open the package, carefully un-braid it, cut the rubber band, divide the package into two lengths and match the color with thread for your machine.
Weft, a string of lengths of hair for wig making
To make most hairpieces it is necessary to weave or sew strands of hair together to make long line of hair, this is called weft. Later in this article I will be showing how to do this on a sewing machine or directly on to clips to use in your hairstyles but it has been done for centuries on a simple loom. I think it would be more than fun to make weft as it was done in the past but that’s for another article. You can see a picture on the Williamsburg site that shows the wigmaker weaving hair to make a string of hair (weft) on linen thread. The finished weft is on the poll to the left of the picture.
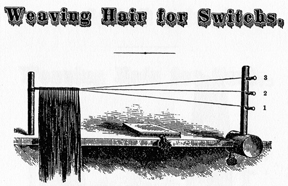
Caption: Illustrations of a wig weaving loom from Campbell’s book “The Techniques of Ladies’s Hairdressing of the 19th Century-a compilation of original 19th century sources” by Mark Campbell and Mons A. Mallemont” pub Lacis. Used with permission.
This is how switches would have been made in the period. We are going to do something similar. Modern stitches are made with much shorter lengths of hair so they have that weft line down almost the entire length of the switch which means it can’t be separated to braid or twist which is why one would want to make ones own.

Caption: Illustrations of a long natural hair switch before twisting and after. The Illustration was taken from Campbell’s book “The Techniques of Ladies’s Hairdressing of the 19th Century-a compilation of original 19th century sources” by Mark Campbell and Mons A. Mallemont” pub Lacis. Used with permission.