How I figured out what it takes to add silk chenille to feathers to make two different headdresses one with Ostrich and one with Goose shoulder feathers. Both of the original extant examples are in the online collections of the Victoria and Albert Museum in the UK.

I started with this one.
Photo from the V&A
Close up of the chenille so I could figure out just how wide and how they attach. As there are lots of red and lots of black and a smaller number of 4 or 5 other colors. I decided on using three ostrich feather tip ends. Two of them would have one color and the third would be mixed. Photo from the V&A


I tried to find a source for silk chenille with no luck so I devised a way to make some.
Photo from the V&A
I stacked 4 layers of silk taffeta on top of itself and sewed rows of very short stitch length stitches,

down the stacked layers. I had to make sure that the stitching was on grain for all the layers and the rows of stitches even. Then I cut the rows apart with the stitches down the middle.

On top is a strip and on the bottom is a strip with the long threads picked away.
It was not the easiest thing in the world but if I clipped it down on one end and held the other end I could use a needle to tease the threads out.
For several days I made chenille. I had a ruff idea how many pieces I needed by counting the barbs on the feathers.


I chose to do the pink first and I lined up the pink strips and cut them to 1″ lengths with a rotory cutter.


I used a clip to fold back the feather so the barbs in the section I wanted to work did not overlap. Then I brushed on some white glue on the last 1/4″ of the barbs.
I pushed to ends of the chenille onto the glue on the barbs with glue. I’m doing this on plastic wrap so that the glued area does not stick to the mat.


They dry fairly fast so when dry I pulled them up and stacked them aside.
I then repeated the process of gluing 10 at a time until I filled all the barbs on this the shortest ostrich tip. If I remember it was about 50.


At the half way point I had to take a look and see how they draped.
Then on to the other half of the feather. I have the other two feathers for this side and each one is about 1″ longer than the one above.


You can see how the weight of the chenille makes the barbs of the feather hang down. Total about 100 barbs/chenille.
Now for the mixed color feather. I made some up in 5 colors.


I used the same steps that I did with the pink except so I would not forgot the order I lined them up.
Because this feather had so many barbs I cut every third one off near the stem. This gave me about the same # of barbs with chenille at the first feather.


I did not cut barbs near the tip.
This is how it looked when it was done. I could get away with the thinning of the barbs because this will not be near the surface and you can’t see the cuts when the pink feather is on top.


It will look like this.
I was planning on doing a dark color like this green for the bottom feather.


I had three ribbons to choose from for the headdress.
I chose the pink so then I did not like the dark chenille for the bottom feather, so…..


I changed to red and started making red.
I repeated all the same steps and I also clipped every third barb from this feather.

Frame (headband)

I took two 12″ pieces of heavy stem wire.
Bent them in the middle so they had two 90° bends.


I then bent these so they had a curve.
I then glued a ~10″ long straight piece of wire so it overlapped the two free ends of the curved pieces about 2″.


I glued the other curved piece to the other end and then covered the joined with florist tape.
It should look like this and hang down just below the ears and fit the curve of the head.


I used clips to figure out the spacing for the feathers on the wire band.
Then it was possible to see the gap in the center and how much space to bow would take up. I cut a separate piece of wire for this so it could be changed out.


I covered it with florist tape.
Then clipped the folds in the ribbon so it would have three on each side and a tail.


I used needle and thread to sew the pinches.
While working from the center out I sewed the pinches and sewed it to the wire.


With the bow wire tacked to the headband it looked like this.
modeling the headdress. Photo by Laurie Tavan.
Photo Tavan FECIT.


Laurie Tavan modeling the headdress.
Photo Tavan FECIT.
Laurie from the side so you can see her period hair style.
Photo Tavan FECIT.


Laurie at the ball with her brisé fan. This time she is wearing it just a little farther back so you can see her earrings.
Photo Tavan FECIT.
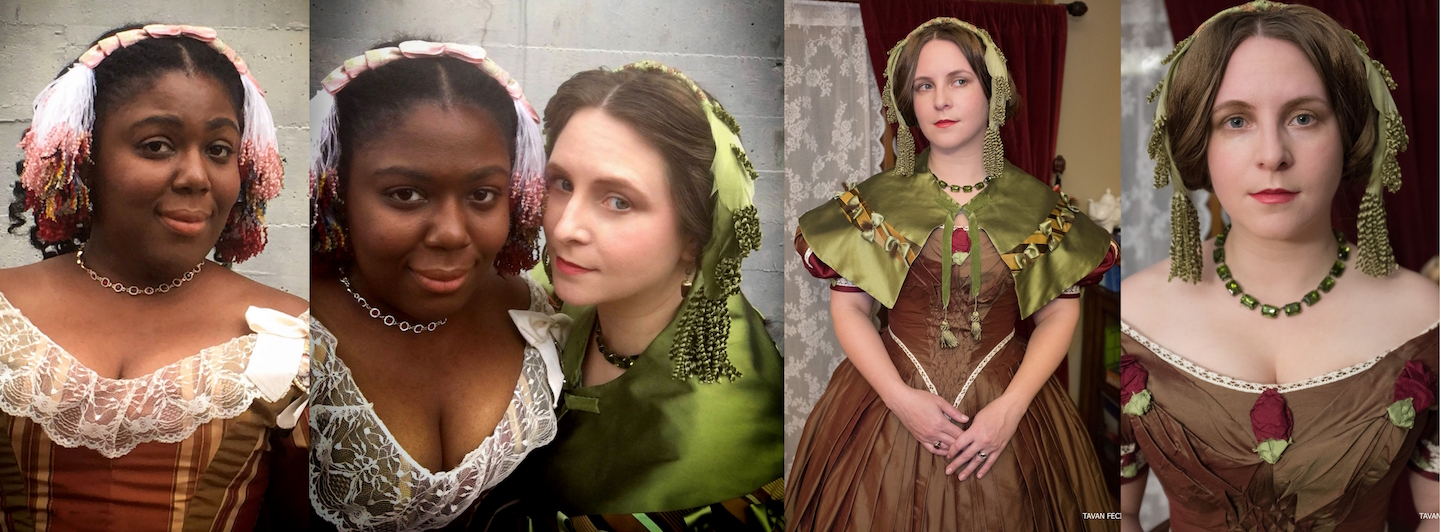
Laurie and friend wearing a chenille and Goose shoulder feather headdress.
Photo Tavan FECIT.


Laurie with a matching caplet .
Photo Tavan FECIT.
This headdress is also modeled about an extant headdress from the V&A I will add more pictures of the making for this headdress later.
Photo Tavan FECIT.

I want to thank Laurie Tavan for helping me display these headdress so well, with her lovely costumes and hairstyles.

This is the extant V&A Goose feather headdress. No bow, instead ribbon wrapped around the headband wire. And this time the chenille is in longer pieces and even looped and twisted. I could count 9 feathers on each side. The bottom three have the long hanging strands, the upper 6 in two layers have the twisted strands.
I used a frosted green silk taffeta with a wider stitch so the chenille I made was a bit wider 4mm instead of 3mm for the last project. When the white warp threads were removed the green matched my goose shoulder feathers.

The chenille was made in the same way. The feathers which were about 6″ long were matched and sorted into rights and lefts then wired so they could be bundled into threes. The wires where covered with a matching color of florist tape. If you look at the left side of the pink V&A headdress you can see the wires and how they bundled the groups. The chenille pieces were glued to the ends of the three bottom feathers 6 per each feather. Then some short twisted chenille pieces were glued to the next rank of feathers and then the longer twist to the top rank. The final step was the wire the bundles to a heaver piece of wire that made the headband. That was covered with florist tape and then ribbon.